

How To Tie A Lasso Knot Step By Step, For Beginners: The lasso knot is a versatile knot that is commonly used in ranching and rodeos. It is a simple knot to tie, but it can be difficult to master. This article will provide you with a step-by-step guide on how to tie a lasso knot, as well as some tips and tricks to help you improve your technique.
How To Tie A Lasso Knot Step By Step, For Beginners
The lasso knot is a versatile knot that is commonly used in ranching and rodeos. It is a simple knot to tie, but it can be difficult to master. This article will provide you with a step-by-step guide on how to tie a lasso knot, as well as some tips and tricks to help you improve your technique.
Materials Needed
To tie a lasso knot, you will need the following materials:
- A length of rope (at least 10 feet long)
- A stopper knot (optional)
The type of rope you use is important. A stiff rope will hold its shape better and make it easier to throw. Nylon and polyester are two popular choices for lasso rope.
A stopper knot is a small knot that is tied at the end of the rope to prevent it from unraveling. This is not essential, but it can be helpful if you are using a new or slippery rope.
If you are new to lassoing, it is a good idea to practice with a shorter rope (around 5 feet long). This will help you to learn the technique without having to worry about throwing a long rope.
Steps On How To Tie A Lasso Knot
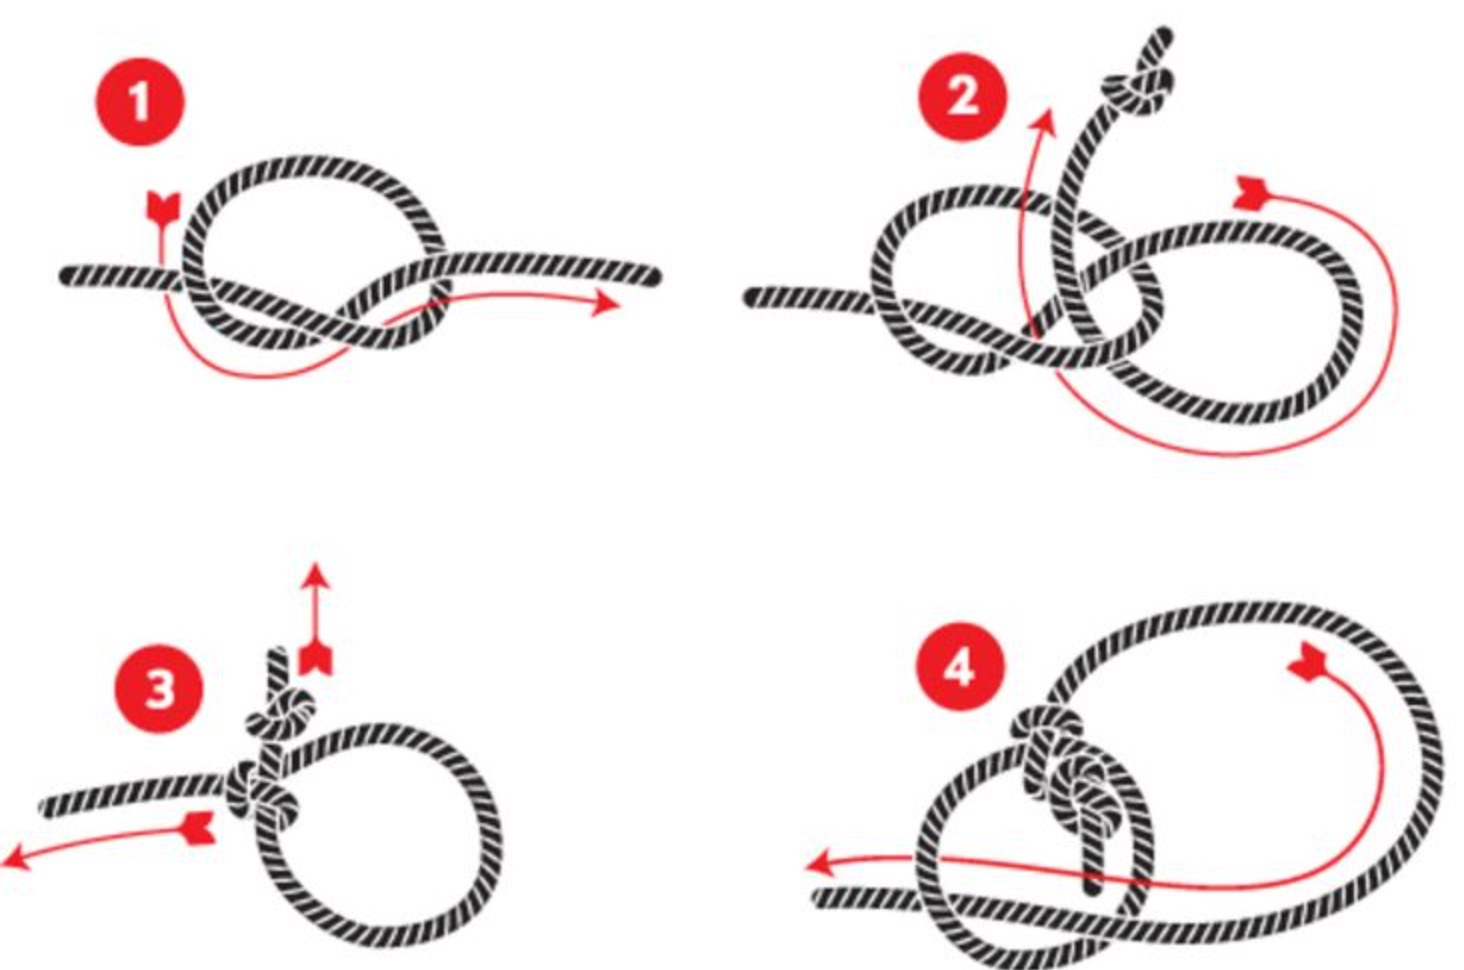
To tie a lasso knot, follow these steps:
- Make a loop in the rope. The loop should be large enough to fit around the object you are lassoing, but not so large that it is difficult to throw.
- Pass the tail end of the rope through the loop.
- Cross the tail end of the rope over the standing part of the rope.
- Pass the tail end of the rope under and through the loop.
- Tighten the knot by pulling on the standing part of the rope and the tail end of the rope.
Here is a diagram of the lasso knot:
Once you have tied the knot, you can adjust the loop size by pulling on the tail end of the rope. You can also tie a stopper knot at the end of the rope to prevent it from unraveling.
Here are some tips for tying a lasso knot:
- Use a stiff rope. This will make it easier to throw the lasso and keep it open.
- Make sure the loop is the right size. It should be large enough to fit around the object you are lassoing, but not so large that it is difficult to throw.
- Practice makes perfect. The more you practice tying a lasso knot, the better you will become at it.
Once you have mastered the basic lasso knot, you can start to learn more advanced variations, such as the adjustable lasso knot and the honda knot.
Variations Of The Lasso Knot
There are several variations of the lasso knot, each with its own advantages and disadvantages. Here are a few of the most common variations:
- Adjustable lasso knot: This variation of the lasso knot has a loop that can be adjusted to fit the size of the object being lassoed. This is useful for lassoing objects of different sizes, such as cattle or wild horses.
- Honda knot: This variation of the lasso knot is used to create a non-jamming loop. This is useful for lassoing objects that are difficult to rope, such as steers with horns.

- Double honda knot: This variation of the honda knot is even more secure than the single honda knot. It is often used in rodeo events such as steer wrestling and team roping.
- Bowstring knot: This variation of the lasso knot is similar to the honda knot, but it is easier to tie. It is often used by beginners and recreational lasso enthusiasts.
Here are some additional variations of the lasso knot:
- Lariat loop: This is the most common type of lasso knot, and it is the one that is typically used in rodeos.
- Hangman’s noose: This variation of the lasso knot is used to create a noose. It is important to note that this knot should only be used for decorative purposes or in emergency situations.
- Cowboy knot: This variation of the lasso knot is similar to the lariat loop, but it is tied with a smaller loop. This makes it ideal for lassoing smaller objects, such as horseshoes or wild pigs.
- Australian braid: This variation of the lasso knot is very strong and secure. It is often used by professional lasso artists and rodeo cowboys.
Which variation of the lasso knot you choose will depend on your individual needs and preferences. If you are new to lassoing, it is a good idea to start with the basic lariat loop. Once you have mastered the basic knot, you can experiment with other variations to find the one that works best for you.
Tips And Tricks
Here are some tips and tricks for tying and using a lasso knot:
- Use a stiff rope. A stiff rope will hold its shape better and make it easier to throw. Nylon and polyester are two popular choices for lasso rope.
- Make sure the loop is the right size. The loop should be large enough to fit around the object you are lassoing, but not so large that it is difficult to throw.
- Practice makes perfect. The more you practice tying a lasso knot, the better you will become at it.
- When throwing the lasso, aim for the center of the object you are trying to rope. Keep the loop open and let the momentum of the rope do the work.
- Once you have lassoed the object, gently pull on the rope to tighten the knot. Be careful not to pull too hard, as this could injure the animal or object you are lassoing.
Conclusion: The lasso knot is a versatile and useful knot that can be used in a variety of situations. By following the steps in this article, you can learn how to tie a lasso knot quickly and easily.